Wednesday, December 31, 2014

End Fed Zep Antenna by N4NR

After some recent morning QSOs on 3740 kHz, there was email discussion about the antenna used by N4NR from his campground location in coastal Georgia. Several of our morning regulars were impressed by the 10 W SSB signal from Dennis. The antenna is an End Fed Zep. (This is a correction to my earlier posting.)

Based on an email response from Dennis, I put together a model of his campground antenna. For my initial analysis I did not include his RV, but a later analysis could add a metallic screen near the vertical portion of the antenna to approximate its effects. I expect that this would show up mainly on the higher bands where the radiation angles are lower.

Below is a series of screen captures from the 4nec2 antenna modeling software to illustrate the theoretical behavior of the antenna. Click on any graphic for a larger view.

First is a view of the antenna structure. 17 ft of 450-ohm ladder line starts at the rig (tuner), goes about 2 ft horizontally, then 15 ft up a fiberglass pole. A single wire, connected to one side of the ladder line, continues up to 22 ft, then continues on an upward angle to a height of about 50 ft for a total length of 84 ft. The other side of the ladder line constitutes the counterpoise. The graphic is to scale, so the two conductors of the ladder line are hard to distinguish. On this version I also used the program's feature to depict the magnitudes of current in the structure, represented by the short green lines. 
The ground parameters are for "marshy, forested flat ground", and the wires are all 12-gauge copper.
Antenna Structure


Next is a series of 12 screen shots showing radiation patterns for four selected frequencies.  I included patterns for total gain, vertically polarized and horizontally polarized. All patterns are oriented in the same direction as the structure graphic above (x-axis and horizontal wires going to the right). The total and vertical patterns are from a low angle facing the antenna broadside, and the horizontal patterns are from directly above the antenna. Click on the slide show below for a better view of the individual slides.


Below you can view impedance plots for two frequency ranges: 3 to 14 MHz and 3 to 29 MHz. Click on any image for a larger view.


Impedance Parameters, 3-14 MHz

Impedance Parameters, 3-29 MHz


Happy New Year!
John WA5MLF


Thursday, November 20, 2014

Spectrum waterfall views on 60 m

During this morning's QSO I captured screen shots of the waterfall display of received signals on my Flex-3000. Below are the views with stations identified, as heard during the 0755 to 0810 CST time frame. (Click on any image for a larger view.)

Above is the display while WA4PTZ was transmitting. The vertical dimension is about 30 seconds of elapsed time. The 60 m channel 1 bandwidth is represented by the gray shading on the top edge. The carrier frequency is marked with a red line. The lighter patches show the received SSB signal level compared with background noise. Some persistent signals (or artifacts) are seen around 5.328 MHz.


Above is the signal display for W4PRE.


Here is the signal view for W4UOA.


Above is a view showing transmissions from KB4XX and W4UOA.


Here is a longer transmission from KB4XX.


For a different view, see the screen shot below from 40 m (7.143 MHz) at about the same time of the previous morning. This shows transmission from KB4PYR with a strong QSO in progress "next door" at 7.140. The yellow and red colors signify much stronger received signals, compared with the 60 m views above.


-- John

Thursday, October 30, 2014

Trying a New Chat Room

While trying out a new chat room set up by W4UOA, we've learned about its features and how to use many of them. Below are some notes and graphics that illustrate some of what we know for now. These may help folks to get more familiar with the chat room usage.

When you open the chat room link in your chosen web browser, the first thing you will see is the log-in box shown below.
The nickname is what displays for you in the chat room. A popular choice is the user's call sign, possibly with a name or other information added. This can be changed at any time during the chat session without logging off.

The main chat window looks like the image below. Click on it for a larger view.
Your nickname will appear at the left end of the Text Entry Box, just below the chat window. Click on it if you want to change it, such as to append extra info.

On the right is the Online Users Box where all logged-in users appear.

The next image below identifies the details of the tool bar that is below the Text Entry Box. Click on the image for a larger view.
The actions of each tool bar button are also identified when you hold your mouse pointer over a button during your chat session. It is good practice to click the disconnect button when you are done with you chat session.

The sound notification (beep) is intended to let you know when anyone posts new text while your attention is elsewhere. You can silence it using the button show. Otherwise, you should hear a beep if ALL of the following conditions are satisfied:
  • Your computer is able to make sounds from other programs (e.g. speakers are on)
  • Adobe Flash is not blocked for this chat app (this may depend on your browser settings)
  • Your mouse pointer is somewhere other than the text entry box of the chat room. If you are actively using the chat room you can seen new posts as they appear.)
As with any web page, you can change the text size by pressing Control + (for larger text) or Control - (for smaller text).

Since this chat app does not use Java, it can be used on mobile devices, too. In my experience, the chat session timed out after a short period of inactivity on one Android and one iOS device, but resuming the chat session was quick.

There are many features that we can customize in this chat app. We invite your comments as we continue to evaluate this chat solution.

John
WA5MLF

Tuesday, September 16, 2014

FoxDelta Analyzer at Tuner Input

Here is an example of what the FoxDelta Antenna Analyzer sees when connected to the input of my LDG AT-100Proll. The graph has plots for three frequencies at which the tuner was tuned:
  • 3740 kHz  - Blue curve
  • 7191 kHz  - Red curve
  • 14200 kHz - Green curve

Click on the image above for a magnified view. 
All plots were done with my 80 m horizontal loop antenna connected to the output of the tuner. For each frequency I performed the following steps:
  • Tuned the tuner for minimum SWR with the transceiver as a source at the selected frequency
  • Connected the analyzer in place of the transceiver
  • Ran a scan from the analyzer software

Using the analyzer mode that enables 3 separate scans to be displayed on a single graph, I saved the composite graph and added frequency labels next to the color legend at the bottom of the graph.

You can see that a good dip in SWR is obtained for first two frequencies. At 14200 kHz, however, the short (84-ft) feed line length did not allow the lowest SWR to be obtained within the 20 m band.

Wednesday, September 3, 2014

TPWINLOG -- Editing log file

During a morning HF roundtable QSO we discussed the ability to edit a log file created by TPWINLOG. Section 7 of the program's ReadMe file discuss the format of the log file.

A user may want to edit the log file in scenarios such as:
  • Error (e.g. name or call sign) discovered just after a contact is logged
  • Duplicate contact logged intentionally with DUPE tag for later correction
  • Error in band or mode recognized and noted for correction while not operating the event

UPDATE 23 Oct 2020: In the most recent versions of the program the log file is named tpqsolog.txt. The instructions below are otherwise still valid.

After exiting the TPWINLOG program, during a break in operating or after the event concludes, you may use a plain text editor program (e.g. Notepad) to edit your log file QSOLOG5.TPQ. It would be prudent to first make a backup copy of the file. When editing the file, it is best to avoid changing the lengths of certain data elements: chapter, band, mode, date, time. The call sign, name, and comment fields will be of variable length.  After editing QSOLOG5.TPQ, when you run TPWINLOG the contact log display and scoring will be updated to reflect the edits. Now you can run the Print feature to generate the output log report on paper or in a file for emailing.

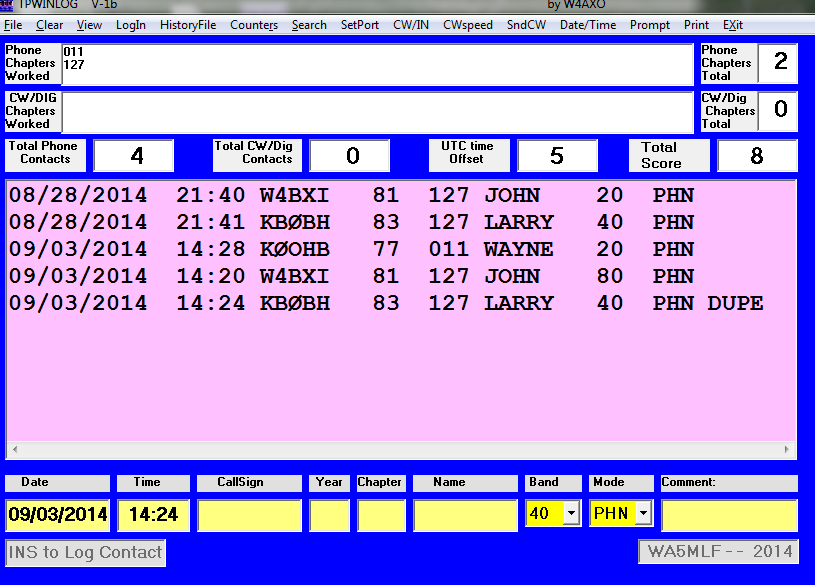
Below is a series of screen shots showing a log of 5 practice log entries and an edit applied to one contact. (Click on any image to expand the view.) The first shows a 5th contact was identified by the program as a duplicate, but was accepted by the operator as a DUPE entry and is not counted in the tally of 4 contacts.


The next screen shows the QSOLOG5.TPQ file opened in a plain text editor. In this example, the operator forgot to change the band to 80 m, but logged the contact as a dupe for later edit. He could have changed the band before Inserting (logging) the contact.


The next screen highlights the changes in the band and the comment field (removing the DUPE tag).

Finally, when the TPWINLOG program is re-started, the log screen reflects the revised tally of 5 contacts.
As noted previously, it's a good idea to practice using the program to log practice contacts and to print the log results. Just be sure to delete the practice contact log before CQ TP starts. See section 4.1 of the program's ReadMe file.


Thursday, August 28, 2014

TPWINLOG Installation

The TPWINLOG program available at this web page was developed by W4AXO to enable logging and CW send functions for the annual Telephone Pioneer QSO Party. This posting supplements the installation instructions provided in the Readme file for the TPWINLOG program. Below is a series of screen shots collected during installation and initial setup of the program.


Installation begins with extraction of the setup files from TPQD.zip, as shown here. Run setup.exe to begin the process. (Click on any image for an enlarged view.)


Here is the initial setup screen. Click OK when ready.


Click on the button shown in this screen shot to continue. You have the option of changing the installation directory before proceeding, as noted in section 2.1 of the Readme file. Some pop-up messages may appear as described in section 2.2.


This screen confirms the successful installation.


For convenience, create a desktop shortcut to the program file TPWINLOG V1b.exe as discussed in section 2.4.

Here is a magnified view of the resulting shortcut icon on the desktop.


Here is the welcome screen that appears when the program starts.


This window tells you that the next step is to input your user information for the program to use.


Here is the form that you fill in once to record your information as discussed in section 3.1. You can replace or edit this information if changes are needed afterward.


Each time you start the program you will have the option to open the Com Port for CW sending. A simple interface for this feature is described in section 10 of the Readme file.


Be sure to study the program usage details in sections 4 through 10 of the ReadMe file.
You should practice using the program before the event, but be sure to delete your file of practice contacts before you start logging for the event. See section 4.1 of the ReadMe file.

Friday, August 22, 2014

Huntsville Hamfest 2014

Here is the group photo from the Huntsville Hamfest. (Click on the photo for a larger view.) Many more photos can be seen at this site. I'll also add the group photo to the Bell Ringers web site.

Tuesday, August 12, 2014

Loop SWR by FoxDelta Antenna Analyzer

W4UOA gave me the opportunity to assemble and evaluate / use his FoxDelta Antenna Analyzer kit FD-AAZ-0912. The assembly was easy, given that 3 surface-mount devices were pre-soldered to the main board or a daughter board. The initial power-up was successful and the device appeared to be mostly ready to go. The Windows software advised that the device firmware needed to be updated to be compatible with the current v 5.03 software. This was easily accomplished using the published instructions and the firmware updater program. A quick calibration with open circuit and short circuit conditions on the BNC antenna port made the device fully ready. The necessary instructions and programs are available at this web page.

I used various features of the analyzer to profile the SWR of my 80 m horizontal loop antenna. The analyzer settings default to measuring 600 points across the designated frequency range, whose default is 1 to 35 MHz. The 47-page user guide covers all the features, but it is very easy to use. There are convenient buttons to quickly select a single band for analysis. A scan of 600 points takes 25 seconds on my ham shack PC. The number of points to scan can be specified in the software. I found that 200 points still gave satisfactory displays, especially for a smaller frequency range. A table of the scan data is also available with the click of a button. Both the graphic display and the table can be exported easily. When the graphic is displayed following a scan, the mouse pointer can be moved anywhere on the graph to display numeric values of SWR and frequency.

Below is a scan of my 80 m loop with a 4:1 balun connected to the 450-ohm feeder. (Click on the image to enlarge.) The gray vertical bands mark the amateur radio band frequencies. The SWR curve has nice dips in or near the 80, 40, 20, 15, and 10 m bands, but not at 60 m. The SWR scale is on the right side, return loss on left side, and the frequency scan is from 3 to 30 MHz, with 600 points of data. A deep dip in SWR occurs near 10.6 MHz, and this is consistent with SWR data calculated from antenna modeling software.


On the 60 m band I've found it necessary to use a 1:1 balun to bring the SWR within range for my automatic antenna tuner, I made a scan using the 1:1 balun. The result is displayed below. Although the SWR is manageable on 60 m, other bands are compromised.
A similar result is obtained with a different 1:1 (choke) balun as shown below.


Returning to the 4:1 balun, I tested the effect of shortening the feed line by 9 ft.  The plot is shown below, and has the same scales as the previous plots. It is easy to see that the shorter feed results in the SWR dips moving higher in frequency. A closer examination of the table data would reveal whether the shift causes significant SWR increase within most of each affected band. The SWR at 60 m is not improved.
Since the FoxDelta analyzer is so convenient to use, I may make additional scans with even shorter feed line lengths before I settle on a final configuration.  It appears that the 1/2 wavelength feed at the lowest band is probably optimal.


Tuesday, July 22, 2014

Feeding a Multi-band Dipole Antenna

During recent on the air discussions we revisited the design options for a multi-band dipole antenna with balanced feeder. Design guidelines for a slightly-shortened dipole antenna are published in the document Choosing the Correct Balun by W8JI. The recommended lengths of balanced feedline are based on odd multiples of 1/8 wavelength on the lowest frequency of operation. This is covered on pages 7 & 8 of W8JI's document.

Some of our group wondered if the same feedline recommendations would apply to a standard half-wave dipole as they do to the slightly-shortened dipole. To explore this topic I used the 4nec2 antenna modeling software to analyze a half-wave dipole of total length 134 ft (12 ga copper) at 30 ft above rocky ground. This length is close to resonance at 3.5 MHz. The shortened dipole in the article, to cover 80 m and above, has length 110 ft.

I collected data for the feed point impedance at one frequency on each of six bands. I also expanded the model to use a 450-ohm feedline of length 30.48 ft (close to the 1/8 wave length of 30.9) and collected the impedance data at the end of the feedline for the same 6 frequencies. The results are shown in the graph and table below.

The graph clearly shows the wide variation of impedance (orange bars) at the feedpoint, while the impedance at the xmt end of the feedline (blue bars) shows that the impedance variation is considerably narrowed. This supports the comments on page 7 of the W8JI document.  At 7 MHz the dipole becomes a full wavelength, with very high impedance, but the feedline -- 1/8 wavelength at 3.5 MHz -- becomes 1/4 wavelength at 7 MHz, thus transforming to a much lower impedance.

The table below gives the data used in the graph. I did not include the resistance and reactance data, but they are readily available.


f (MHz)
Z (xmt)
Z (fp)
3.5
338
56
5.3
539
1156
7
105
5970
14
839
2433
21
453
1637
28
225
1180

This analysis covers only the 1/8-wavelength feeder case, but any other lengths (e.g 3/8, 5/8) can be analyzed easily.

John

Monday, May 5, 2014

VoIP Patch: Links


As background, here are some links (in reverse date order) to blog postings about the topic. Several of us morning regulars, especially W4BXI and W4UOA, have put together and tested various configurations over the past five years. The configurations have been successful for the great majority of the time, but testing has revealed some configurations that work better than others or are easier to operate than others.

There are many variations of PC hardware and different ways to use the available VoIP services. 

http://thebellringers.blogspot.com/2014/02/voip-patch-discussion.html

http://www.w4uoa.com/2013/03/dual-skype-one-computer-skype-patch.html

http://www.w4uoa.com/2013/01/w4bxi-napkin-patch_25.html

http://wa5mlf.blogspot.com/2012/03/sound-card-controls-for-voip-patching.html

http://wa5mlf.blogspot.com/2012/03/voip-patch-update.html

http://thebellringers.blogspot.com/2011/07/voip-phone-patch.html

http://thebellringers.blogspot.com/2009/09/latest-w4bxi-system-audio-drawing.html

http://thebellringers.blogspot.com/2009/08/voip-hf-radio-bridge-in-qst.html

http://thebellringers.blogspot.com/2009/04/w4bxi-system-audio.html

http://www.w4uoa.com/2008/08/voip-hf-bridge.html

Monday, March 31, 2014

102nd Titanic Special Event Station

Here is info about the special event stations that will commemorate the sinking of the Titanic:

W0S  
Apr 12-Apr 13, 1400Z-1400Z,
Frequencies (MHz): 21.265, 14.265, 7.265, 3.865.
Contact: N0SAP David Beckler,
1137 W Crane Dr, Nixa, MO 65714.
n0sap@yahoo.com

W4S
Apr 12-Apr 13, 1200Z-0100Z, 
Frequencies (MHz): 21.335, 14.235, 7.265, 3.985
Clinton, TN.
Contact: KC4RD Jim Womack,
617 Black Oak Rd, Clinton, TN 37716.
kc4rd@arrl.org

Tuesday, March 18, 2014

Map of morning QSO regulars

It's been 4 years since I produced a Google Earth map showing where members of our HF radio group are located. Below is a screen shot of a new map that shows the locations of most stations who have participated in our morning QSOs on 75, 60 and 40 m.  Some are on the air daily while others are occasional participants. Click on the map to see a full-sized copy. This updated version includes several more stations.

At this scale, some stations that are close together do not have their callsigns displayed. Below is another view that is zoomed in on the area with the majority of AL, GA, TN and NC stations.

Both maps give a good view of the relative distances and directions among stations. The first map shows which distant stations (like mine) experience fading signals on the lowest bands as the sun moves higher each morning.

John
(updated 3/19/2014)

BirmingHAMfest Photos

Photos from the event, taken by KC0ONR, can be viewed here.


Thursday, March 13, 2014

Using Windows XP after April 8

Page 13 of this 40-page report discusses the use of Windows XP after the end of Microsoft support next month. It provides a list of recommended actions to reduce the exposure to future exploits if you plan to continue using XP.

The report was a small part of episode 446 of the Security Now netcast on March 11.

For those who are interested, the episode's major topic of iOS Security is based on this report from Apple.


73,
John

Friday, February 7, 2014

VoIP Patch Discussion

Our group has tested many variations of hardware-based and hybrid hardware-software-based phone patches. Several variations of patches based on VoIP computer applications seem to work well, enabling the radio operator to be on a full-duplex VoIP conversation with the distant phone user. One way of accomplishing this is to use two PCs: one to provide the radio interface and another to provide the control operator's audio paths. This has also been done with a single PC when the sound card hardware or radio interface provide some needed mixing or monitoring features.

Today's discussion moved toward understanding the minimum required configuration to accomplish the patch while still using VoIP. The drawing below (click to expand) is my attempt to identify the functions and interfaces that are needed. It is not a solution, but is intended to stimulate further discussion that may lead to the best solution. One of the desired features is to enable the control operator to use a high quality microphone for all of his speaking needs.


Comments are welcome, and together we can test some additional configurations to find what works best. I applaud W4BXI for his persistence in testing and using so many alternative approaches. A simplified approach will make the patch capabilities accessible for a greater number of our radio friends.